TM 10-3930-675-20-2
0110 00-2
SLAVE STARTING RECEPTACLE REPLACEMENT - CONTINUED
0110 00
RIGHT SLAVE STARTING RECEPTACLE REMOVAL - CONTINUED
3.
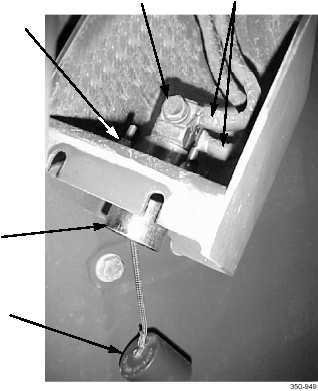
Remove four locknuts (7), eight washers (8), four screws (9), slave starting receptacle (2), and cord of cap (1) from
bracket (6). Discard locknuts.
4.
Remove two screws (10), lockwashers (11), and two cables (12) from rear of slave starting receptacle (2).
RIGHT SLAVE STARTING RECEPTACLE INSTALLATION
NOTE
New slave starting receptacle comes with new lockwashers.
1.
Position slave starting receptacle (2) to bracket (6) and install two cables (12) to rear of slave starting receptacle with
two new lockwashers (11) and screws (10).
2.
Install slave starting receptacle (2) and cord of cap (1) to bracket (6) with four screws (9), eight washers (8), and four
new locknuts (7).
3.
Install bracket (6) to vehicle with four screws (5), eight washers (4), and four new locknuts (3).
4.
Install cap (1) on slave starting receptacle (2).
12
10,11
7,8,9
2
1